One of the reasons why people chose WordPress as their website’s CMS may be because reading it somewhere that it is SEO-friendly. Just have a look at the WordPress’ list of ‘features’ on their page to see that they are proud to say that their platform is SEO-friendly
But don’t get it wrong that just simply launching a website from WordPress is enough and you’ll start to see your rankings on the top of the search engines. You still need to learn to use and implement the correct WordPress SEO tips to get traffic and rankings of your website.
The platform has many great features that offer the best SEO practices to make your life easier. Below you’ll find the top WordPress SEO tips that will help you optimize your website.
Contents
- 1 What is WordPress SEO?
- 2 WordPress SEO Checklist
- 2.1 WordPress SEO Basics
- 2.1.1 1. Make The Right Choice & Set Your Preferred Domain
- 2.1.2 2 Choose A Credible Hosting Provider
- 2.1.3 3. Use An SEO-Friendly WordPress Theme
- 2.1.4 4. Install A Free WordPress SEO Plugin
- 2.1.5 5. Check your Site’s Visibility Settings
- 2.1.6 6. Enable SEO Friendly Permalinks
- 2.1.7 7. Verify Your Site With Google Search Console
- 2.1.8 8. Submit Your XML Sitemap
- 2.2 Optimizing Pages & Posts
- 2.3 Advanced WordPress SEO Tips
- 2.1 WordPress SEO Basics
- 3 Wrapping Up
What is WordPress SEO?
WordPress is not a substitute for a solid SEO strategy, but there is no denying that the CMS saves you a lot of time and helps you to implement the best practices without experience. But you need to understand that to rank your website on Google you need to put in the effort.
The CMS doesn’t dictate that you’ll rank well or not unless your website suffers from technical issues that stop it from crawling or being indexed.
Just using WordPress and the SEO tactics you use doesn’t mean that it will change your rankings and traffic for your website. You still need to generate great content, earn good and relevant backlinks, make sure that the website is well-optimized and free from the technical issues that could hold it back.
Before you learn how to optimize your website properly and start to increase your traffic, there are some basics that you need to make sure are covered if you want to work with a solid build.
WordPress SEO Checklist
WordPress SEO Basics
1. Make The Right Choice & Set Your Preferred Domain
While launching your website, several questions may hound you. One of them being if you should include www in your domain or not. Many people are of the notion that it affects the SEO of your WordPress website.
Honestly, there is no SEO benefit if you have www in your domain. It will not influence your rankings also in any way.
When it comes down to choosing a www vs a non-www domain is a matter of personal preference. If you prefer shorter URLs, in which case you could go with non-www domains.
But you need to make sure that your domain is accessed on just one of these because they are considered as separate domains by Google.
To do so you need to go to Settings > General and set your preferred domain.

2 Choose A Credible Hosting Provider
Did you know what your visitors expect when they visit your website? Fast site speed, latest information, how secure is the website and so on. So, make sure that your host provides you with all this.
Of the above-mentioned factors, site speed is the most important and has a direct impact on your WordPress site’s SEO performance. Low site speed increases bounce rate, and this averts the visitor from revisiting your website which eventually comes down to affecting your website’s SEO. You would definitely want to choose the cheaper one but keep in mind that going for a cheaper option will put your website’s performance and ranking at stake.
You can surely consider WordPress’s host recommendations: Bluehost, Dreamhost and SiteGround.
3. Use An SEO-Friendly WordPress Theme
After launching WordPress, the first theme you will see is it’s default theme ‘Twenty-Twenty’. It is obvious that you wouldn’t be continuing with the default theme.
You will find yourself in a pool of free and paid themes available on the dashboard. Choosing a theme otherwise would be easy, but here you have to select a theme that is SEO friendly. You will be attracted to themes that have many scripts and plugins to offer. But, but, if they are as good as obsolete or useless for your site, do not choose such a theme since it may bring down your site’s performance.
Before you finally decide your theme, make sure to run through a demo with the help of Google’s web.dv tool to get an exact idea about the theme’s impact on SEO.
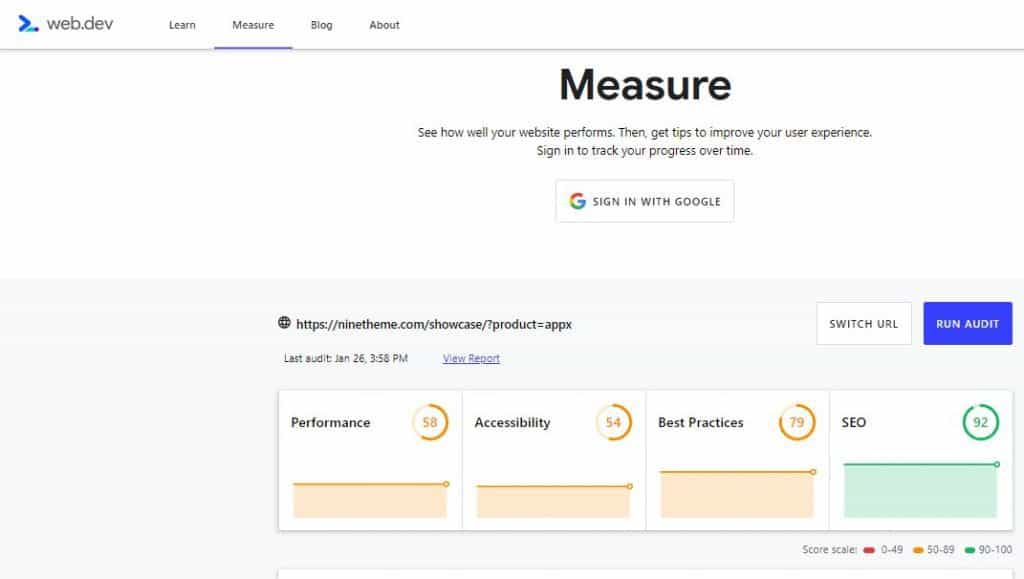
4. Install A Free WordPress SEO Plugin
WordPress plugins work as a helping hand. The plugin optimizes certain elements of your website’s structure to make it crawl on the search engines. Since we are talking about a free WordPress SEO plugin, you can either choose Yoast SEO or All in One SEO Pack.

If you believe that these plugins will optimize your site then you are highly mistaken. It just makes your work a tad easier from the SEO perspective. It helps to optimize your metadata, meta description and page title which helps improve your visibility in search engine results. You will have to write a title tag and meta description which is optimized according to the keywords.
To install plugins you need to go to the admin panel and page down the left-hand menu and in that Plugins > Add New.
5. Check your Site’s Visibility Settings
WordPress offers the ability to disallow the search engines from indexing your site, which means it won’t rank.
This feature is commonly used by developers when a site is in the development phase so that it won’t be indexed while content and pages are not complete.
It is more common to find that this block is left to look after launch. So in order to check if the block is unticked or not go to Settings > Reading.
Here is how the checkbox for it is and you can find it right at the bottom of the page.

6. Enable SEO Friendly Permalinks
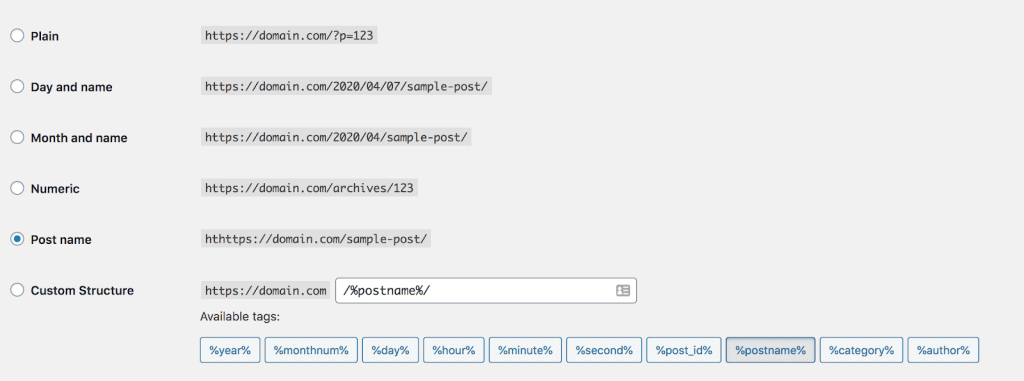
WordPress provides you with a number of different options for how you can structure your URLs, and make sure you have selected the most SEO-friendly option.
WordPress uses URLs like this:https://domain.com/?p=123 by default.
As you can see these URLs are not search engine-friendly, and by keeping this no one can identify what the page is about from the URL alone.
Luckily, you can change and choose a custom URL structure by going to Settings > Permalinks
For most sites, you will want to choose ‘Post name’ for your permalinks.
7. Verify Your Site With Google Search Console
While doing all these things don’t forget that you need to verify your WordPress site with Google Search Console. If you have not done this before, you need to create an account in the Search Console, after creating an account you’ll see a window as follows
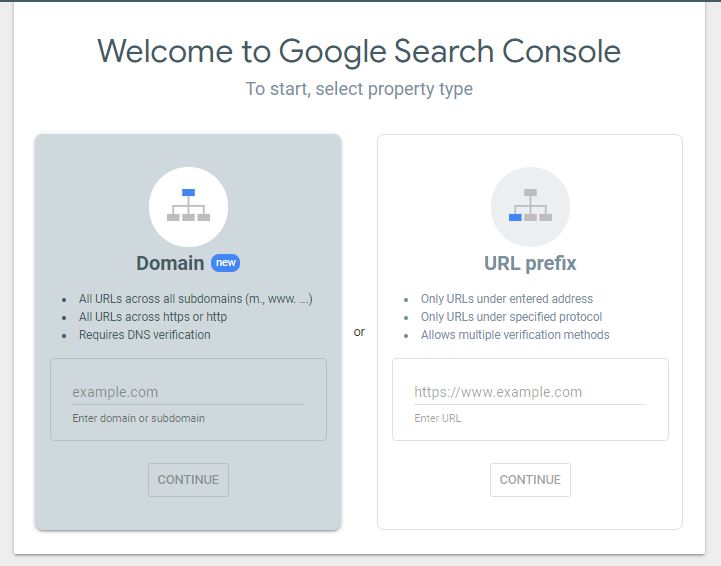
Follow the steps as mentioned in the image and you’ll get a code that you have to add to your WordPress website and choose the ‘HTML tag’ method.
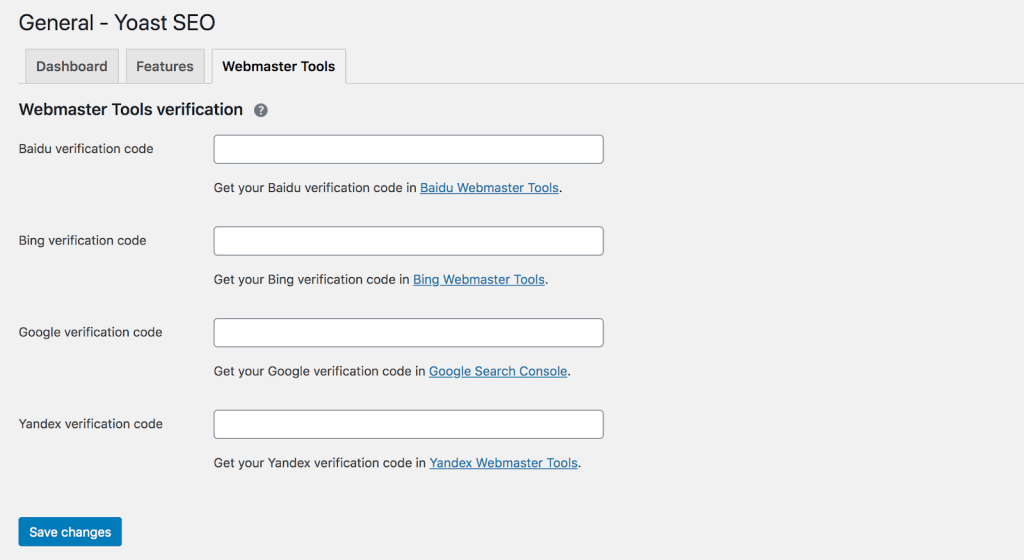
From there, go to the Yoast plugin and in that go to SEO > General > Webmaster Tools.
Enter (Add ‘the’)HTML tag into the ‘Google verification code’ box:
8. Submit Your XML Sitemap
Once you verify your website with Google Search Console, you need to submit your sitemap in order to help Google to crawl your website.
To submit your sitemap go to the ‘Sitemaps’ tab in Google Search Console
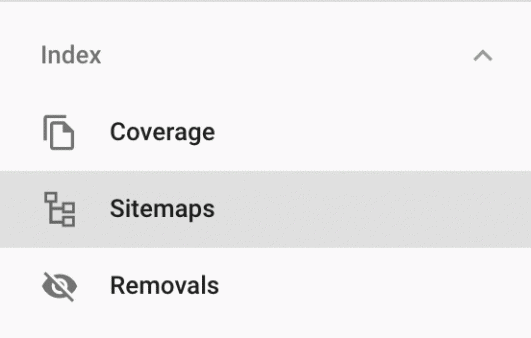
And submit your sitemap in the ‘Add New Sitemap’ section

Optimizing Pages & Posts
Once you have completed implementing the WordPress SEO basics, get ready to start optimizing your site and work on the things that make the real difference in how you rank.
First, let’s optimize pages and posts before sharing some advanced tips and tactics that will help you to take your site to the next level.
9. Carry Out Keyword Research
Without keyword research, you won’t be able to know for what search terms you should optimize your site’s content. And keyword research should be the first step of any SEO project and also be used in on-page optimization and planning your site content.
So, whenever you are writing a blog post or publishing a page, always have a focus keyword in mind. Don’t craft a post just for the sake of publishing more content.
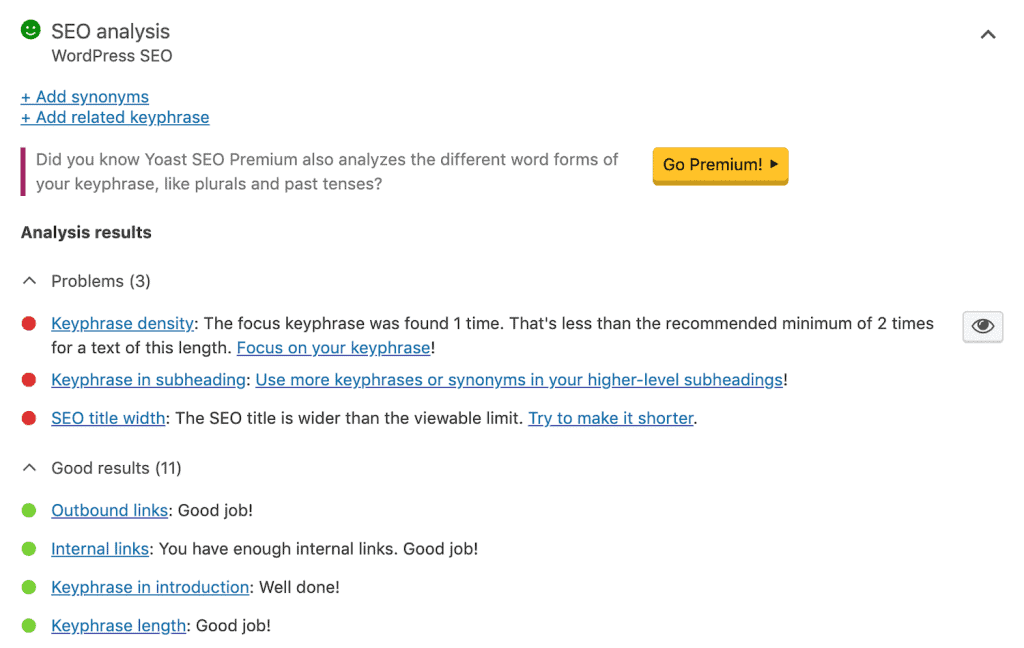
If you are worried about the focused keyword that you have used is added properly throughout the page or blog then don’t worry. WordPress SEO plugins like Yoast offer you a feature where you insert the focused keyword and tell you if it has been used properly or not.
10. Create Great Content
It goes without saying, but willing to rank at the top of Google, you need to create great content.
And you might have heard this catchphrase a number of times: content is king. It’s actually true because this is what separates good websites from (add – the) bad. It is also the most powerful tool for positioning, brand awareness, and growth in the digital world.
Don’t only focus your content strategy to only please Google with proper structure and keywords, but make sure it also serves your audience too. So here are some key elements you can keep in mind while creating a content strategy:
- It has to be relevant to the reader and also should provide in-depth solutions to the problems they are looking for
- Length matters, so a mere 200 word content won’t rank on Google
- Content needs to be optimized for search engines, but it should also emphasis on the readability, storytelling, and the true value of information
- Content doesn’t always mean written format, it can also come in the form of infographics, videos, images, and more
- Every piece of content should represent your brands personality
11. Set Custom URLs
By default, WordPress uses your page’s title to create the URL, meaning that these can end up being lengthy and sometimes truncate on the SERPs.
Let’s say you have launched a piece of content which is titled ‘The Best Dogs Beds to Buy In 2020.’ Dependent on how you set your permalinks, you are likely going to end up with a URL of https://domain.com/the-best-dog-beds-to-buy-in-2020.
However, you know that the main keyword which you are targeting with the content is “best dog beds”. The good news is that you can choose to overwrite the default URL and choose a custom permalink for the page.
Simply click the “edit” button, and you can enter your preferred URL.
12. Use Optimized Page Headings
As well as creating your page’s default URL, the page title also defines your H1 heading. Not familiar with what this is?
A page’s H1 heading is intended as a way to give context on what your page is about to both users and search engines. Think of it the same as the title of a book.
Best practices typically call for using one H1 heading (the page’s title), but you should also use H2 – H6 headings; they give structure to your content, also to break up the text and make it easier to read.
If your H1 is the book’s title, the H2s are chapters, with subsequent tags acting as subheadings. Page headings are a great place to include your page’s main keyword and variants but don’t over-do this and never force the inclusion of a keyword somewhere that it doesn’t naturally fit.
You can add H2 – H6 tags into your content by clicking onto a block, selecting the style as ‘heading’ and choosing the type:
13. Craft Unique Optimized Title Tags & Meta Descriptions
Your page’s title tag tells users and search engines what your page is about and is commonly regarded as being an important ranking factor. It is what feeds the clickable page title you see on Google search results.
Yoast automatically sets your page’s title tag using your page heading, but you also have the ability to overwrite this to improve on it and work in variations of keywords that you might not include in your page’s heading:
You can either use snippet variables, add custom text as your title tag, or use a mix of both.
You should consider rewriting your title tag to include variants that define location or intent:
Use keyword research to guide how you optimize each page’s title tag and read this guide to learn more about how to structure this important page element.
And while meta descriptions are no longer a direct ranking factor, they do indirectly impact your site’s organic performance due to CTR (click-through rate). It is worth spending time to write enticing descriptions (these can be any length but typically truncate after around 160 characters). You can add meta descriptions within the same section as title tags:
14. Use Internal Linking
You need to use internal linking within your content to help establish topical relevance between different pages on your site, to pass authority earned from external links, and to help users efficiently navigate.
Adding in internal links to other pages in WordPress is really simple. All you need to do is highlight the text which you want to link (this will be your link’s anchor text) and click the ‘link’ button on the toolbar, which will then allow you to either paste a URL or search for pages within your site.
Check out our guide to building an internal linking strategy to learn how to choose the most suitable pages to link to.
15. Use SEO Optimized Names For Images
You should be using images and rich media within your content. In fact, a Backlinko study found a correlation between using at least one image on a page and rankings.
It is all too easy to simply upload a screenshot or image with a useless file name, and it is not something we always pay attention to, but we should.
Before uploading an image to the WordPress media library, make sure you are using optimized file names — this helps to give further context to a page. Rather than /image123.jpg for an image of a large dog bed, use /large-dog-bed.jpg. It is simple; make sure that the file name of the image reflects what it shows.
If you need to rename images after they have been uploaded, here is how.
16. Add Alt Text to Images
When using images in your content, make sure you are adding alt text to each of them. Not only are alt tags a principle of web accessibility to aid visually impaired users with screen readers, but they help to give context and a description of images to search engines.
Ensure your alt tags reflect a clear description of what the image shows. You can add alt text to any image within WordPress in the ‘Image Settings’ section of the ‘blocks’ menu:
Think carefully about how you write your alt text. If this is your image:
Use alt text like ‘starry square dog bed’ rather than defaulting just to ‘dog bed.’ Be as descriptive as you can be, and use unique alt text for each image.
Advanced WordPress SEO Tips
If you follow the tips and the advice mentioned above, you can easily implement the basics of WordPress SEO with ease. Think of the tips as some checklists that need to be followed for every page or post you create, and you won’t struggle with going wrong.
But what about website performance? What can be done to improve that and rank above your competitors? Don’t worry here we bring you some advanced WordPress SEO tips that you can use.
17. Install Cache Plugin
As WordPress offers strong performance for your website, there are improvements that can be done to site speed that all sites can make, especially when site’s speed is considered as a strong ranking factor.
You can get very technical on improving your site’s speed, but one of the most effective ways to increase this is by using a caching plugin to cache your posts and pages as static files. These static files are served to your users, rather than being dynamically generated each time and can significantly improve performance.
WordPress recommends using either W3 Total Cache, WP Super Cache, or Cache Enabler.
18. Optimize Images
Another proven way to improve your site’s speed and performance is to optimize your images, as these are one of the most common things which contribute to slow speed.
If you are using lots of images and rich media within your content, the size of the page can increase noticeably, but this is often because images are not being properly optimized. A common image issue is using one that is much larger than the size than the image will actually display at — this is a sign that the image was not optimized.
The good news is that you can quickly optimize your WordPress site’s entire media library, as well as all future images you upload using the Smush plugin.
19. Noindex Tag Pages & Other Low-value Content
WordPress uses a number of different page taxonomies, including categories and tags. Categories serve a great purpose, especially when grouping content together:
Example: You launched a recipe collection, and you want to use categories for different cuisines.
Tags are smaller and typically focused on specific topics.
Example: One recipe my tag parmesan cheese, pasta, and butter.
Tags are rarely useful to users that aren’t already on your site. From an SEO perspective, these pages rarely offer anything of value, and you typically don’t want these pages to be indexed and send traffic from Google (traffic quality is low).
And the same applies to media pages and other post formats that WordPress uses. Usually, you don’t want these to be indexed by Google, and you can add ‘noindex’ tags straight within Yoast.
Head to: SEO > Search Appearance > Taxonomies
Here, you can choose whether or not to show the taxonomy type in search results.
Make sure you select ‘no’ for any taxonomies, content types, or archives (found in another tab), which you don’t want Google to index.
As another note here, head to the ‘Media’ tab and make sure that the ‘Redirect attachment URLs to the attachment itself?’ option is selected as yes, as this helps to prevent an issue which occurred in Yoast back in 2018 where individual attachment URLs were being indexed.
20. Mark Up Your Pages with Schema
Schema markup helps your SEO efforts by adding context to your content and data. It helps search engines to understand your content, also it presents it in a different and useful way, which enhances a searchers’ experience.
To put it simply, by adding context to your pages, you are making it more likely that you not only rank higher but also get clicks when your page receives impressions.
Thankfully, since Yoast 11.0, a full structured data graph is built for every post or page on your site, but there are instances where you will want to mark up specific blocks within WordPress. You can do this when you create a new block by choosing a ‘Yoast Structured Data Block’, which you can read more about here.
21. Use ‘Last Updated’ Dates
You should regularly be updating your evergreen content to ensure it is always current and relevant, but a question that is often asked is whether you should be changing the original publishing date of your pages and posts, removing dates all together or something else.
One suggestion is to use ‘last modified’ or ‘updated on’ to show users and search engines when your content was last updated, giving them the confidence that the information is current and relevant right now. Thankfully, you can easily add last modified/updated info on your WordPress pages and posts using the WP Last Modified Info plugin.
Wrapping Up
WordPress is one of the most SEO-friendly CMS’ out there, and that is one of the reasons why it is so popular. Not only is it user-friendly, but it is easy to implement a whole host of SEO tactics using just a small number of fantastic plugins.
If you are running WordPress, you have made a good choice. By following the steps above, you are putting yourself in a great position to outrank your competitors.
Related Article: Squarespace SEO Guide



2 thoughts on “20+ WordPress SEO Checklist”
I got this site from my pal who shared with me regarding this site
and now this time I am browsing this web page and reading very informative articles or reviews here.
The information shared is of top quality which has to get appreciated at all levels. Well done…