Social media has been a place to connect with people from around the globe for years – that’s the intended purpose. Individuals log on to Instagram, Twitter, Facebook, Snapchat, and the many other platforms available causing a flood of people to showcase their lives and moments with millions of others through images, textual posts, and videos.
These social media networks then started getting the idea that they could monetize their platform if they allowed businesses to pay them for advertising. Pretty ingenious right? Pay for a sponsored public slot on Instagram or Facebook with a post of a product, service, or piece of content. And depending on what strategy you’ve decided on, you can budget for clicks or conversions.
For each new major platform to offer an advertising option, businesses scatter to understand how it works and what the best methods for conversions are. Of course, as time progresses and these platforms grow, their ideas on advertising change (hopefully for the better). In this case, Facebook came up with a new idea for the digital marketer.
Advertising on Facebook has been a part of the platform since its early stages but has progressed rapidly since then. Nowadays, Facebook has a new advertising tool called Facebook pixel.
Contents
What is Facebook Pixel?
The Facebook pixel is a free tracking code that you embed in your website’s HTML. This piece of code allows you to measure, optimize, target, and retarget your Facebook audiences. When Facebook first introduced the pixel, it was actually two separate pieces of code known as the “conversion tracking pixel” and “custom audience pixel”. Facebook has since combined the two to make tracking and converting easier for marketers.
For Facebook ad campaigns, this means:
- Sales conversion tracking
- Conversion optimization
- Audience retargeting
- Dynamic ads
- Custom conversions
- Advanced audience matching
How Does it Work?
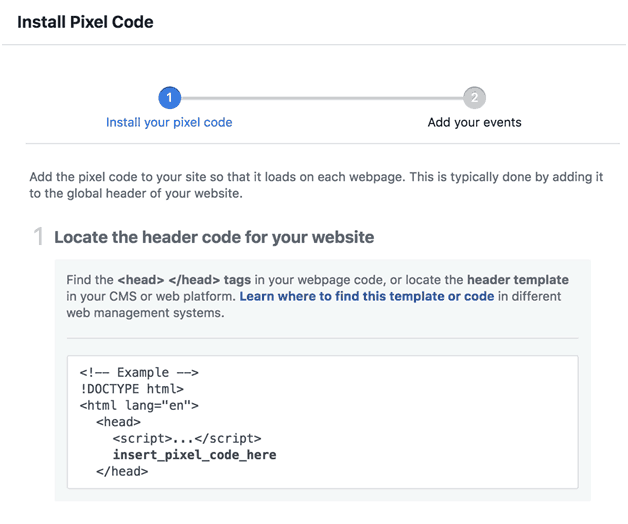
When you request to add a Facebook pixel, Facebook will provide you with the HTML code to embed on your website in the <head></head> section of the code. Getting your Facebook pixel is very simple. From here, you’ve given Facebook the authority to track Facebook users from your website onto Facebook.
In order for Facebook to provide you with the best results for your campaigns, you can customize your audience and sales funnel conversions. If you don’t, then you’ll be using “standard events” which work too but they’re not as specific to your audience and goals. Through customizing, you’ll be directing Facebook to target very specific audiences who have visited your website. Examples include:
- Facebook users who have visited your website within X amount of time
- Facebook users who have visited a particular page of your website
Do I need a Facebook Page?
Yes, otherwise Facebook is unable to provide you business analytics for traffic and conversions. Remember, Facebook is tracking Facebook users who’ve visited your website. This will provide you a greater amount of detail on the demographics of the users visiting your website and what products/services they’re interested in.
Why Should You Incorporate a Facebook Pixel?
Facebook has over 1.47 billion active users daily! It’s the largest social media platform available and 93% of marketers are already using Facebook advertising. It would be wrong to assume that Facebook advertising isn’t for everyone (unless you don’t have a website). Even then, you can still make use of Facebook ads.
You may or may not already use Facebook advertising but even if you do, why wouldn’t you try to increase your efforts with another strategy? If you don’t use a Facebook pixel, you’re missing out on:
Following users off-platform:
- Facebook will use your ads and links to track Facebook users off the platform and onto your website
- Provide you information on where users go, what pages and products their viewing
Tracking live website traffic activity:
- Get reports on where users landed and what product(s) they spent the most time searching
- Retarget those users with ads that are customized to their product searches
Custom conversions:
- Add extra code to create a custom event specific for a URL to target a precise user audience
- Create a completion page (such as a “thank you” page) for that specific conversion
- Bought a product/service
- Signed up to email list
- Commented
- Left a review
Facebook will track and report all of the audience analytics for you on a dashboard so you can keep up-to-date on the customer journey funnel.
How to Install Facebook Pixel
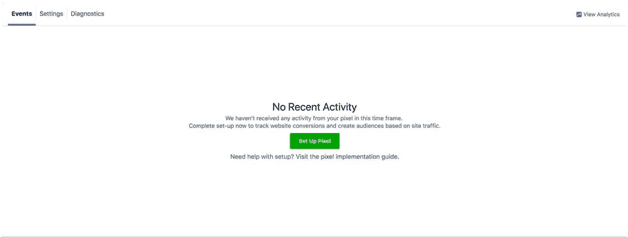
Under your Facebook Business Manager account, go to Events Manager and click on your Pixels tab. This is where you’ll find your Facebook pixel(s) and how to get started on creating one.
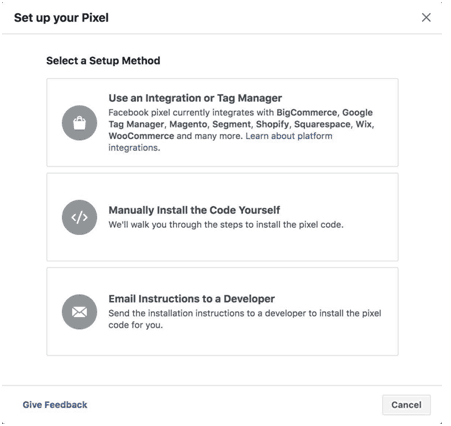
When you click on Set Up Pixel, you’ll be creating a new pixel and will be presented with 3 setup methods:
Choose 1 of the 3 methods depending on the platform your website was built on or if you’re comfortable installing it yourself. To manually install and execute a new Facebook pixel, select the second option. There is a 4 step guide for installation and testing.
Step 1: Locate your website header code (this is where you’ll need to paste the pixel code).
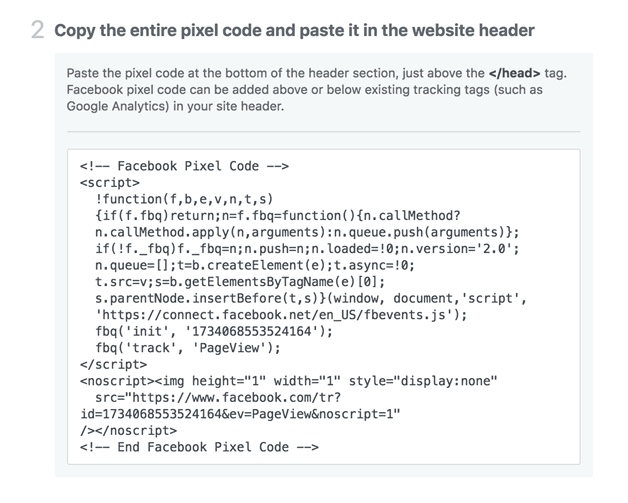
Step 2: Add the code to your website. You’ll be given the pixel code that will need to be inserted within the <head></head> tags in your website’s header HTML. Copy and paste this unique code.
Note: Be careful that you don’t break the website HTML code as this will cause difficulties with the functionality and design of your website. Also, ensure that you copied the entire pixel code, otherwise the tracking won’t work.
Step 3: Decide if you want Automatic Advanced Matching. This allows Facebook to instantly take your acquired customer’s information (if they have any) and sync it to Facebook’s data. This includes information such as their email addresses and phone numbers (probably a good idea to sync to make the tracking process faster).
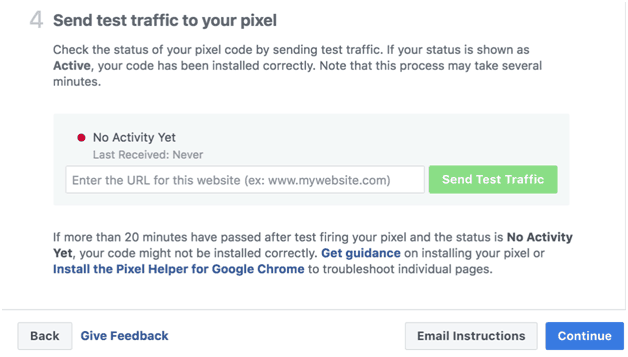
Step 4: Send test traffic. After you have added the pixel code to your website, you should check to make sure that you are receiving tracking data on visitors. Insert your website URL for Facebook to send test traffic to your website. If Facebook recognizes the pixel code and can effectively track data, then you’ll be provided with an Active greenlight. If not, then it’s a sad No Activity Yet. You may have to wait a few minutes for Facebook to recognize the pixel code so don’t think it will be instantaneous.
Adding Events
You’re almost there! Now you need to add your event(s).
Step 1: Educate yourself on what an event is and why you need it.
An event is known as “any action on your website that can be tracked”. This is how Facebook will be tracking your visitors through their platform. Events are tracked through CTAs (call-to-actions) such as buttons, landing pages, purchases, or email sign-ups. Whatever the case, you have to create an event for your specific web pages otherwise there isn’t going to be tracking on any specific CTA, just an overview of web traffic.
Step 2: Add the type of event that you’re tracking. Toggle the step 2 items and edit your settings for each individual event category your pixel(s) data will be assigned to. From here, you can set event features such as:
- Track event on page load: The action for the event can be tracked when a visitor lands on a specific page.
- Track event on inline action: If the action you’re tracking requires a click.
- Event parameters: Measure the conversion value (how much the product/service costs) and currency (USD, Euro, etc.) of each product.
Facebook will then present you with a new code specific to the web page on your website that is hosting this event. You’ll need to copy this code and add it in your HTML for that page. Don’t edit or replace the previous pixel code you’ve added to your HTML. This is an individual code for your specific event. To add for:
- Page load events: Paste the code directly underneath the page’s header section (under the <body> tag).
- Inline action events: Add the code between script tags for the exact actions you’re tracking (such as a purchase button).
Step 3: Choose to use the Pixel Helper. This is a Google Chrome extension that reviews your website pages with events for installation errors. It’s name says it all.
And you’ve officially setup your pixel!
Using the Facebook Pixel
Once you’ve successfully installed your Facebook pixel, you’ll start gathering data on tracking analytics. These analytics can be used for multiple purposes but a main strategy being remarketing. This is a super exciting strategy for Facebook marketers. You can directly target Facebook users who’ve viewed a page or a product/service of interest and Facebook will provide them an ad specific to what they viewed on your website! If you’re interested in breaking away from SEO strategies and are willing to target customers through a PPC method, then Facebook advertising is definitely for you.
From here on, you’ll be able to reconfigure your events for whatever actions and strategies your events are helping you track. Now get started on your new pixel!

